Legacy Motion Guide for Motion version 3.1.17
This is the version of the Motion Guide that matches release 3.1.17 of Motion.
It is a snapshot of how the Guide looked like before it was updated to fit version 3.1.18.
You cannot edit this old version of the Guide and there is not really any point in doing so.
Follow this link to the up to date
MotionGuide.
Table Of Contents
What is Motion?
Motion is a program that monitors the video signal from one or more cameras and is able to detect if a significant part of the picture has changed. Or in other words, it can detect motion.
The program is written in C and is made for the Linux operating system.
Motion is a command line based tool. It has absolutely no graphical user interface. Everything is setup either via the command line or via a set of configuration files (simple ASCII files that can be edited by any ASCII editor).
The output from motion can be:
- jpg files
- ppm format files
- mpeg video sequences
How do I get Motion and what does it cost?
Motion is an open source type of project. It does not cost anything. Motion is published under the
GNU GENERAL PUBLIC LICENSE (GPL) version 2 or later. It may be a bit difficult to understand all the details of the license text (especially if your first language is not English). It means that you can get the program, install it and use it freely. You do not have to pay anything and you do not have to register anywhere or ask the author or publisher for permission. The GPL gives you both rights and some very reasonable duties when it comes to copying, distribution and modification of the program. So in very general terms you do not have to worry about licensing as a normal hobby user. If you want to use Motion in a commercial product, if you want to distribute either modified or original versions of Motion - for free or for a fee, you should read the license carefully. For more information about free software and the GPL, I encourage you to study the very interesting documents about the subject available the of the Free Software Foundation pages about the
Philosophy of the GNU Project.
Maintenance and Support
Both Motion and the Motion Guide are written by people that do all this as a hobby and without asking for any payments or donations. We have a life other than developing Motion and its documentation. This means that bugfixes and updates to this guide are done as our time and families allow it. You are however encouraged to participate and contribute in a very active
mailing list. It is a list with a very "positive attitude" and with many contributors that propose features, post patches, discuss problems and patiently answer newbie questions with a very positive spirit. Expect 1-10 emails per day.
To get motion direct your browser to the
Motion Homepage.
Under the
download page you will find a series of stable versions and a series of development versions.
Motion was originally written by Jeroen Vreeken who still actively participates in the development of Motion and later Folkert van Heusden continued as a lead programmer with Kenneth Lavrsen responsible for Motion Guide, website and releases on Sourceforge.
From version 3.1.12 Motion is now project managed entirely by Kenneth Lavrsen, and the project now shift towards being developed by many contributers.
For support we encourage you to join the mailing list instead of writing to Jeroen, Folkert or Kenneth directly. We are all very active on the mailing list and by using the mailing list much more users will have benefit of the answers. Newbies and stupid questions are welcome on the list. Contributions in the form of patches are also very welcome on the mailing list.
Which version to download and use?
Development has stopped on the 3.0 branch. Latest release on this branch was 3.0.7-1. This branch is no longer being actively developed and lacks many nice features.
From version 3.1.13 (Motion Guide version 2.0) no longer supports the 3.0 branch. There is a motion_guide that fits 3.0.7-1 in the distribution package if you wish to still use the old version.
Currently the community is working on the 3.1.X branch which is actually quite stable also but with some new features that are not fully refined. If the latest is not working try the 3.1.10 and install the "Webcam Stream Timeout" patch which removes the worst known bugs.
Shortly the current 3.1 X branch will be frozen as a stable 3.2 and experimental development will continue on a 3.3 branch.
Version 3.1.13 tries to both address some user wishes and tries to simplify the user interface. This also means deleting, renaming and adding new options. This has been necessary since the config option suite has grown ad-hoc over the years and it had become time to clean things up a bit.
Debian users can find binary packages of selected versions of motion here:
http://packages.debian.org/unstable/graphics/motion
What features does Motion have?
See more description at the
Motion Homepage.
- Taking snapshots of movement
- Watch multiple video devices at the same time
- Watch multiple inputs on one capture card at the same time
- Live streaming webcam (using multipart/x-mixed-replace)
- Real time creation of mpeg movies using libavcodec from ffmpeg
- Create mpeg movies from snapshots after events using mpeg_encode
- Take automated snapshots on regular intervals
- Take automated snapshots at irregular intervals using cron
- Sending an e-mail when detecting movement
- Sending a SMS message when detecting movement
- Execute external commands when detecting movement
- Motion tracking
- Feed events to an MySQL or PostgreSQL database.
- Feed video back to a video4linux loopback for real time viewing
- Web interface using motion.cgi
- User configurable and user defined on screen display.
- Control via xml-rpc - small control binary to control motion while running
- Ability to recognize certain types of motion (prediction feature - not refined to anything useful yet )
- Automatic noise and threshold control
- Ability to control the pan/tilt of a Logitech Sphere (or Orbit) camera
- Highly configurable display of text on images.
- High configurable definition of path and file names of the stored images and films.You can find more information and links at the Motion Homepage.
Linux vs. FreeBSD
Motion is originally developed for Linux and it is still mainly developed and supported for this platform. From version 3.1.15 an experimental port has been made by Angel Carpintero. Not all features of Motion are supported at this time and it still needs a lot of test time on different hardware. Angel is very interested in feedback. Join the Motion Mailing List and give your feedback there. Patches for bugfixes and for enabling the missing features are very welcome. The rest of this guide is still mainly targeted for Linux users.
Documentation
You have the following sources of information:
- This document (you are lucky to have found it).
- The author of the program has written a description of the technology behind motion.
- The man page. After installation simply write man motion
- The default motion.conf file that comes with the package.
- Misc. document that comes with the package gives a few hints. When this is written the FAQ describes the wrong information about where motion searches for the motion.conf file.
Supported Hardware
Input devices: Here we are thinking about the cameras.
Motion supports video input from two kinds of sources.
Standard video4linux devices (e.g. /dev/video0). Motion has no drivers for cameras. Installing the camera itself is outside the scope of this document. But here are some nice links.
Network cameras (which are actually cameras with a built in web server that can be connected directory to your network).
See also the
Frequently Asked Questions
Using Motion with Net cameras such as Axis:
Users on the mailing list have reported that certain versions of the CURL library (lib curl) do not work with Motion. If you CURL version 7.9.X you may run into problems. Some reports indicates that curl >=7.10 and < v7.10.8 should work fine.
A new report indicates that the for example an AXIS205 does not even work with 7.10.X but should work well with CURL version 7.11.2. So the recommendation is to update your CURL library to the latest available and at least version 7.11.2 if you need Motion to work with Netcams.
Kernel 2.6 and pwc. Note that for kernel 2.6 there is a new release of the Philips WebCam (pwc and pwcx) drivers 9.0.1. It is recommended to install this (requires kernel rebuild). Hopefully it will enter the kernels soon. See Logitech Quickcam Orbit or Sphere just below this for what you must do if you have pwc 9.
If you use use a
Logitech Quickcam Orbit or Sphere using the driver pwc/pwcx and kernel 2.6.X and you have installed pwc version 9.0.1 you should replace the file in the Motion sources called pwc-ioctl.h with the one that comes with the pwc 9.0.1. (a copy is in the Motion sources also called pwc-ioctl.h-pwc9.0.1 - rename it to pwc-ioctl.h after renaming the current to something else). There has been some small adjustments in the API that requires that you have the right header file. The error is only seen when you try to rotate the camera as this creates an error 'motion: failed VIDIOCPWCMPTGRANGE Invalid argument'.
Motion is distributed as source files that you must compile yourself.
The short overview of the steps to install Motion.
- Preparation: Motion uses a number of shared libraries that must be installed on your computer before you can build Motion. The needed shared libraries depends on the features you wish to use. Features network camera, ffmpeg, MySQL and PostgreSQL needs specific shared libraries installed. See preparation section for more information.
- Download the motion source files (distributed as tar'ed and compressed files). Place the file in a place of your own choice.
- Untar and uncompress the file to the place you want the program installed. Editor recommends placing the motion source file directory in /usr/local. If you do not have write access to the /usr/local directory (you are under the mercy of an ignorant system administrator with a severe case of paranoia) - you can install the program in a directory in your home directory. You will then need to read the next section about how to configure before you compile the program. Below is shown the exact commands using version 3.1.X installed in /usr/local as an example (replace /path/to with the actual placement of the tar.gz file).
cd /usr/local
tar -xvzf /path/to/motion-3.1.X.tar.gz
- You will now have created a directory called motion-3.1.X. You can rename it to motion (mv motion-3.1.X motion). I recommend creating a symbolic link to the current version. This way you can more easily experiment with different version simply by changing the link.
ln -s motion-3.1.X motion
- Now change to the new directory
cd motion
- Run configure. You can start with the defaults. If you need to modify the installation parameters you can read the next section.
./configure
make
- Install the code, manual page, etc
make install
- In /etc/motion/etc you will find a file called motion-dist.conf. If it is the first time you install Motion - rename this file to motion.conf and edit as a minimum the settings: videodevice, input, norm, frequency, width, height and target_dir. That should get you going.
- Run the program. To enable more features you must modify the config file or add command line options. You will not get too far with the defaults. The command line is nice for quick experiments. But for normal use I recommend using the config file.
motion
Note: If you're using SuSE 9.2, you might want to
ADDITIONALLY have a look at
Compiling on SuSE 9.2. As mentioned on that page as well,
you will still need to read the instructions here as well.
Before you start you may need to install a number of shared libraries that Motion uses. If they are missing the feature will simply normally not be included. Most of these libraries can be found on the CDs of your distribution. A few will have to be downloaded from the Internet. Note that when you install software using pre-compiled binaries (Redhat type RPMs, Debian debs etc) you normally only get what is needed to run the programs themselves. In order to compile other programs from source that uses these pre-compiled libraries you also need to installed the development packages. These are normally called the same name as the package suffixed by -devel or -dev. These development packages contains the header files (xxx.h) that Motion needs to build with the shared libraries. If you build a library from sources you already have these header files. It is recommended to simply install the pre-compiled binary packages and their development brothers.
This is a list of shared libraries used by Motion and the RPM packages that provides them.
Motion will always need these libraries to be built and work
| Library |
RPM Packages |
Debian Packages |
| libm, libresolv, libdl, libpthread, libc, ld-linux, libcrypt, and libnsl |
glibc and glibc-devel |
libc6 , libc6-dev ,libglib1.2 |
| libjpeg |
libjpeg and libjpeg-devel |
libjpeg62 and libjpeg62-dev ( optional libjpeg-mmx-dev ) |
| libz |
zlib and zlib-devel |
zlib1g and zlib1g-dev |
If you need to connect to a
Network Camera you need these libraries (cURL and the packages requires for cURL):
| Library |
RPM Packages |
Debian Packages |
| libcurl |
curl and curl-devel |
curl, libcurl2 and libcurl-dev |
| libssl and libcrypto |
openssl and openssl-devel |
libssl0.9.6, libssl-dev and openssl |
| libgssapi_krb5, libk5crypto, and libcom_err |
krb5-libs |
libkrb53 |
For generating mpeg films with
ffmpeg you need this library:
(See also the section 'Generating MPEG films with ffmpeg' for how to install ffmpeg and libavcodec)
Motion must be installed with revision 0.4.8 of ffmpeg. Motion will soon be supporting ffmpeg 0.4.9pre1 when this version is generally available as packages
(*) Debian doesn't provide deb packages for ffmpeg due patent issues. So you can build yourself from source or from
Christian Marillat website or apt repository.
deb ftp://ftp.nerim.net/debian-marillat/ stable main # ( woody )
deb ftp://ftp.nerim.net/debian-marillat/ testing main # ( sarge )
deb ftp://ftp.nerim.net/debian-marillat/ unstable main # ( sid )
Add the suitable line to your /etc/apt/sources.list and run this:
apt-get update ; apt-get -y install ffmpeg libavcodec1 libavcodec1-dev
For using
XML-RPC remote control of Motion you need this library:
(See also the section 'Controlling Motion via xml-rpc' for how to install xmlrpc-c)
| Library |
RPM Packages |
Debian Packages |
| libxmlrpc |
xmlrpc-c and xmlrpc-c-devel - or install from source!
You also need w3c-libwww and w3c-libwww-devel |
libxmlrpc-c0 , libxmlrpc-c0-dev , libwww-dev (for -lwwwzip ) |
For logging in
MySQL you need this library:
For logging in
PostgreSQL you need this library:
Configure is script that you run to setup the build environment for the C-compiler. It generates the "Makefile" which the program "make" uses to compile and install the software.
To run configure your current directory must be the motion directory. You type
./configure
You can add the parameter
./configure --help to get help on the different switches.
This is walk through of the options.
When you run make, all the C-source files are automatically compiled and linked. Just look out for error messages.
Make uses a file called "Makefile" which is generated by the "configure" script you just ran. If you have special needs you can manually edit this file. Next time you run configure a new Makefile will be generated and your changes are lost.

Attention!
If you have run
make before, you should run a
make clean before running
make again. This cleans out all the object files that were generated the previous time you ran
make. If you do not run
make clean first before you rebuild Motion you may not get the additional feature included. For example: If you built Motion without XMLRPC support and then add it later - and rebuild Motion without running
make clean first - the XMLRPC feature does not get compiled into the Motion binary.
First time you build motion run
./configure,
make,
make install. If you need to build it again (to run with different configure options) run
./configure,
make clean,
make,
make install.
Make Install
make install simply copies all the nice files that were generated during the compilation/linking that make did.
Makes the directories (if they do not already exist): /usr/local/bin, usr/local/man/man1, /usr/local/etc, /usr/local/doc/motion-3.1.X, /usr/local/doc/motion-3.1.X, and /usr/local/examples/motion-3.1.X.
Copies the following files from the base motion directory (assuming the default PREFIX /usr/local was used when running configure - otherwise adjust to the actuals you chose)
- Executable binary "motion" to /usr/local/bin
- Manual page "motion.1" to /usr/local/man/man1
- Document files "CHANGELOG, COPYING, CREDITS, INSTALL, and README to /usr/local/doc/motion-3.1.X
- Example configuration files "motion.conf*" to /usr/local/examples/motion-3.1.X
- Configuration file "motion.conf" to /usr/local/etc
Note that the any existing files are overwritten. Pay attention to your configuration file motion.conf. You may not want this overwritten. Keep a copy in a safe place before you run "make install". Editor recommend renaming the motion.conf in the source code directory after the very first installation. This way you will not accidentally overwrite the real motion.conf file.
Un-install
From the motion base installation directory you simply run
make uninstall
And delete the base installation directory in /usr/local and any link pointing to it. If you have forgotten where you installed it or someone else did it for you, simply search for the files and directories starting with motion. If the filenames and the directories match the names described in the "Make Install" section of this document, you can safely delete them.
Additional Make Options
The make command can be run with several options.
make,
make install and
make uninstall has already been described above.
- make clean
- deletes all the binary files (object files) and the motion binary generated by make. It also deletes temporary files and any jpg files that motion has saved in the motion source directory. It is very important to always run
make clean before you run make if you change the configuration (like adding features such as XMLRPC or ffmpeg) and rebuild motion.
- make distclean
- deletes the files: config.status, config.log, config.cache, Makefile, and motion.spec.
- make updateguide
- fetches a fresh new copy of this guide and place it in your motion source directory. Note that the pictures are not downloaded.
- make dist
- performs make clean, make distclean and make updateguide in one single operation.
If you are upgrading from motion 3.0.X or from an older version of 3.1.X you should note that many options have been removed from version 3.1.13 and forward and many new have arrived. You still have all the old features. The options have been changed for two reasons. New more flexible features and to simplify getting started with Motion.
You should also note these differences.
- The use of thread files has completely changed. Read the section "The Config Files" carefully.
- The mask file format has changed. Read the section about "Mask File"
- If you use the database features you need to note that from version 3.1.15 and forward the fields have been redefined. Removed are second, minute, hour, day, month and year. Instead these six have been replaced by a real timestamp field called time_stamp. The relatively new field 'type' has been renamed to 'file_type' to avoid reserved SQL words. A new field 'text_left' has been added which stores the text given by the config option text_left. And last a field called 'camera' has been added which stores the thread number.
- From 3.1.15 the ffmpeg feature now also supports mpeg4 and msmpeg4. The build process of Motion now use ffmpeg libraries as shared libraries. The --with-libavcodec has been replaced by a --with-ffmpeg which only needed to specify if you are installing ffmpeg from sources in a non-standard location. If you have installed ffmpeg from sources already you will need to rebuild by running (from within the ffmpeg source file root) ./configure --enable-shared followed by make and make install. If you had installed ffmpeg from a binary RPM or deb you probably don't have to do anything.
The table below shows the new options in the left column and the options they replaced in the right column. Realmotion has not been replaced.
Important Definitions
Motion is invoked from the command line. It has no GUI. Everything is controlled from the command line and from config files. The editor recommend only using the config files as this is easier in the long run and much less confusing having all options in one place.
A few important definitions.
- A snapshot is a picture taken at regular intervals independently of any movement in the picture.
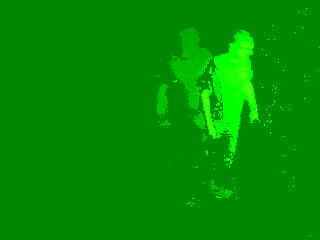
- A "motion" image/mpeg shows the pixels that have actually changed during the last frames. These pictures are not very useful for normal presentation to the public but they are quite useful for testing and tuning and making mask files as you can see exactly where motion sees something moving. Only the Y-channel is shown which make the motion images green.
- A normal image is the entire image taken by the camera.
The Config Files
The name of the config file must be 'motion.conf'. When you invoke Motion it will search for the configuration file called 'motion.conf' in the following order:
- Current directory from where motion was invoked
- Then in a directory called '.motion' in the current users home directory (shell environment variable $HOME). E.g. /home/goofy/.motion/motion.conf
- The directory defined by the --sysconfdir=DIR when running .configure during installation of Motion
(If this option was not defined the default is /usr/local/etc/)
If you have write access to /usr/local/etc then the editor recommends having only one motion.conf file in the default /usr/local/etc/ directory.
Motion has a configuration file in the distribution package called motion-dist.conf. When you run 'make install' this files gets copied to the /usr/local/etc directory.
The configuration file needs to be renamed from motion-dist.conf to motion.conf. The original file is called motion-dist.conf so that your perfectly working motion.conf file does not accidentally get overwritten when you re-install or upgrade to a newer version of Motion.
If you have more than one camera you should not try and invoke Motion more times. Motion is made to work with more than one camera in a very elegant way and the way to do it is to create a number of thread config files. Motion will then create an extra tread of itself for each camera. If you only have one camera you only need the motion.conf file. The minute you have two or more cameras you must have one thread config file per camera.
An option that is common to all cameras can be placed in motion.conf. (You can also put all parameters in the thread files but that makes a lot of editing when you change a common thing).
An option that is unique to a camera must be defined in each thread file.
The first camera is defined in the first thread file called from motion.conf. The 2nd camera is defined in the 2nd thread file called from motion.conf etc.
Any option defined in motion.conf will be used for all cameras except for the cameras in which the same option is defined in a thread config file.
Motion reads its configuration parameters in the following sequence. If the same parameter exists more than one place
the last one read wins.
- Motion reads the configuration file motion.conf from the beginning of the file going down line by line.
- If the option "thread" is defined in motion.conf, the thread configuration file(s) is/(are) read.
- Motion continues reading the rest of the motion.conf file. Any options from here will overrule the same option previously defines in a thread config file.
- Motion reads the command line option again overruling any previously defined options.
So always call the thread config files in the end of the motion.conf file. If you define options in motion.conf AFTER the thread file calls, the same options in the thread files will never be used. So always put the thread file call at the end of motion.conf.
If motion is built without specific features such as ffmpeg, mysql etc it will ignore the options that belongs to these features. You do not have to remove them or comment them out.
If you run the XML-RPC command motion.conf.write (motion-control conf write) motion will overwrite motion.conf and all the thread.conf files by autogenerated config files neatly formatted and only with the features included that Motion was built with. If you later re-build Motion with more features or upgrade to a new version, you can use your old config files, run the motion.conf.write command, and you will have new config files with the new options included all set to their default values. This makes upgrading very easy to do. It requires that Motion is built with the XML-RPC feature.
SYNOPSIS
motion [ -BCDhlmNpQw] [ -a seconds] [ -c changes] [ -d device] [ -E command]
[ -F file] [ -f nr] [ -G seconds] [ -g seconds] [ -i input] [ -L noise] [ -M address] [ -n norm]
[ -O command] [ -P device] [ -q quality] [ -S nr] [ -s widthxheight] [ -t target dir]
[ -u user:pass ] [ -U webcam_path ] [ -V device]
These are the options that can be used in the config file. They are overridden by the command line!
All number values are integer numbers (no decimals allowed). Boolean options can be on or off (values "1", "yes" and "on" all means true and any other value means false).
Some configuration options are only used if Motion is built on a system that has the matching software libraries installed (cURL, MySQL, PostgreSQL and FFMPEG).
cURL (libcurl)
- netcam_url, netcam_userpass
MySQL
- mysql_db, mysql_host, mysql_user, mysql_password
PostgreSQL
- pgsql_db, pgsql_host, pgsql_user, pgsql_password, pgsql_port
FFMPEG (libavcodec)
- ffmpeg_cap_new, ffmpeg_cap_motion, ffmpeg_filename, ffmpeg_timelapse, ffmpeg_timelapse_mode, ffmpeg_bps, ffmpeg_variable_bitrate, ffmpeg_video_codec
A signal can be sent from the command line by typing e.g.
kill -s SIGHUP pid, where the last parameter is the process ID which you get by typing
ps -ef ¦ grep motion. The PID is the first on the list which is the parent process for the threads.
Motion responds to the following signals:
| Signal |
Description |
Editors comment |
| SIGALRM |
Motion will generate a snapshot. |
|
| SIGHUP |
The config file will be reread. |
This is a very useful signal when you experiment with settings in the config file. |
| SIGTERM |
If needed motion will create an mpeg file of the last event and exit |
|
| SIGUSR1 |
Motion will create an mpeg file of the current event. |
|
Before you can start using motion you need to know some basics about your camera.
Either you have a camera connected directly to your computer. In this case it is a video4linux type of camera. Or you connect to a network camera using a normal web URL.
video4linux (V4L) devices
You need to install your camera with the right driver. It is out of scope of this document to tell you how to do this and it depends on which type of camera. Once installed the camera(s) will have the device names /dev/video0, /dev/video1, /dev/video2...
FreeBSD has a different naming of devices. When you build Motion for FreeBSD the default device name is /dev/bktr0. Under FreeBSD a TV card has a special device for controlling the tuner (e.g. /dev/tuner0). The option tunerdevice is only valid when Motion is built and running under FreeBSD. For Linux do not include this option in the config file (remove or comment out).
Your camera or capture/TV card will not support any picture size. You must know which frame size (width and height) the camera supports. If you do not know start with width 320 and height 240 which most cameras and capture cards supports.
You also need to choose framerate. The faster you fetch picture from the camera the more CPU load you get and the more pictures get included when Motion is detected. The value must be minimum 2.
You need to know if the camera supports auto brightness. Most cameras have auto everything. If you do not know assume that it has and do not use the Motion autobrightness feature. At least not to start with.
USB cameras take a lot of bandwidth. A USB camera connected to a USB 1.1 port or hub consumes all the bandwidth. Even with a small framesize and low framerate you should not expect to have more than one camera per USB 1.1 controller. If you need more than 1 USB camera add extra USB PCI cards to your computer. There exists cards that have 4 inputs each with their own controller and with full bandwidth. Must 4-input cards only have 1 controller. USB cameras do not have the feature of selecting input channels. _To disable the input selection the option 'input' must be set to the value 8 for USB cameras (default)_.
Composite video cards are normally made with a chip called BT878 (older cards have a BT848). They all use the Linux driver called 'bttv'.
There are cards with more then one video input but still only one BT878 chip. They have a video multiplexer which input is selected with the config option 'input'. Input channel numbers start at 0 (which is why the value 8 and not 0 disables input selection). There are video capture cards available with 4 or 8 inputs but only one chip. They present themselves as one single video device and you select input using the 'input' option. If you define e.g. 4 thread config files with the same videodevice name but different input numbers Motion automatically goes into round robin mode. See the round robin section for more information. Many TV tuner cards have the input channels: TV Tuner = 0, Standard composite video = 1, S-VHS = 3. Other have TV=0, composite video 1= 1, composite video = 2, S-VHS = 3. For video capture cards input 1 is normally the composite video input.
Some capture cards are specially made for surveillance with for example 4 inputs. Others have a TV tuner, a composite input (phono socket) and perhaps also a S-VHS input. For all these cards the inputs are numbered. The numbering varies from card to card so the easiest is to experiment for 5 minutes with a program that can show the videostream. Use a program such as Camstream or xawtv to experiment with the values.
If you use the TV tuner input you also need to set the frequency of the TV channel using the option 'frequency'. Otherwise set 'frequency' to 0.
Finally you need to set the TV norm. Values: 0 (PAL), 1 (NTSC), 2 (SECAM), 3 (PAL NC no colour). Default is 0 (PAL). If your camera is a PAL black and white you may get a better result with norm=3 (PAL no colour).
If the netcam_url option is defined all the video4linux options are ignored so make sure the netcam_url option is commented out if you do not need it.
These are the parameters used for video4linux devices.
###########################################################
# Capture device options
############################################################

#Videodevice to be used for capturing  (default /dev/video0)
#for FreeBSD default is /dev/bktr0
videodevice /dev/video0

#Tuner device to be used for capturing using tuner as source (default /dev/tuner0)
#This is ONLY used for FreeBSD. Leave it commented out for Linux
; tunerdevice /dev/tuner0

#The video input to be used (default: 8)
#Should normally be set to 1 for video/TV cards, and 8 for USB cameras
input 1

#The video norm to use (only for video capture and TV tuner cards)
#Values: 0 (PAL), 1 (NTSC), 2 (SECAM), 3 (PAL NC no colour). Default: 0 (PAL)
norm 0

#The frequency to set the tuner to (kHz) (only for TV tuner cards) (default: 0)
frequency 0

#Rotate image this number of degrees. The rotation affects all saved images as
#well as mpeg movies. Valid values: 0 (default = no rotation), 90, 180 and 270.
rotate 0

#Image width (pixels). Valid range: Camera dependent, default: 352
width 320

#Image height (pixels). Valid range: Camera dependent, default: 288
height 240

#Maximum number of frames to be captured per second.
#Valid range: 2-100. Default: 100 (almost no limit).
framerate 2

#Let motion regulate the brightness of a video device (default: off)
#Only recommended for cameras without auto brightness
auto_brightness off
Network Cameras
Motion can connect to a network camera through a normal TCP socket. All you need to give it is the URL. The URL given must return one single jpeg picture. For the time being Motion cannot connect to a video stream such a mpeg, mpeg4, divx or mjpeg. The URL must return one single jpeg image!
Also watch out that you do not use a URL that create an HTML page with an embedded jpg. What must be returned is the jpg picture itself.
When the netcam_url is defined all the video4linux options above are ignored!!
#URL to use if you are using a network camera, size will be autodetected (incl http://)
#Must be a URL that returns single jpeg pictures. Default: Not defined
; netcam_url value

#Username and password for network camera (only if required). Default: not defined
#Syntax is user:password
; netcam_userpass value
Round Robin feature
This feature is automatically activated where multiple threads are sharing the same video device. Each thread can then set different input channels or frequencies to change camera. These are the special Round Robin options:
- If multiple threads use the same video device, they each can capture roundrobin_frames number of frames before having to share the device with the other threads.
- When another thread wants to watch another input or frequency or size the first roundrobin_skip number of frames are skipped to allow the device to settle.
- The last option switch_filter is supposed to prevent the change of camera from being detected as Motion. Unfortunately it seems that many have problems detecting motion at all when this option is enabled. We are working on improving it. You are probably better off turning this option off.
Note that in version 3.0.7 the two options are spelled roundrobing_frames and roundrobing_skip. From version 3.1.8 the spelling has been corrected to roundrobin_frames and roundrobin_skip. If you upgrade from 3.1.6 or earlier, remember to update your config files to the right spelling for these two features.
These are the options that controls the detection of motion. Further details follows after.
############################################################
# Motion Detection Settings:
############################################################

#Threshold for number of changed pixels in an image that
#triggers motion detection (default: 1500)
threshold 2000

#Automatically tune the threshold down if possible (default: on)
threshold_tune off

#Noise threshold for the motion detection (default: 32)
noise_level 32

#Automatically tune the noise threshold (default: on)
noise_tune off

#Enables motion to adjust its detection/noise level for very dark frames
#Don't use this with noise_tune on. (default: off)
night_compensate on

#Despeckle motion image using (e)rode or (d)ilate or (l)abel (Default: not defined)
#Recommended value is EedDl. Any combination (and number of) of E, e, d, and D is valid.
#(l)abeling must only be used once and as the last letter.
#Comment out to disable
despeckle EedDl

#PGM file to use as a sensitivity mask.
#Full path name to. (Default: not defined)
; mask_file value

#Ignore sudden massive light intensity changes given as a percentage of the picture
#area that changed intensity. Valid range: 0 - 100 , default: 0 = disabled
lightswitch 0

#Picture frames must contain motion at least the specified number of frames
#in a row before they are detected as true motion. At the default of 1, all
#motion is detected. Valid range: 1 to thousands, recommended 1-10
minimum_motion_frames 1

#Specifies the number of pre-captured (buffered) pictures from before motion
#was detected that will be output at motion detection (default: 0)
pre_capture 0

#Number of frames to capture after motion is no longer detected (default: 0)
post_capture 0

#Minimum gap between two events (seconds) (default: 60)
#An event is defined as a series of motion images taken within a short timeframe.
gap 60

#Minimum gap in seconds between the storing pictures while detecting motion.
#Default: 0 = as fast as possible (given by the camera framerate)
minimum_gap 0

#Maximum length in seconds of an mpeg movie
#When value is exceeded a new mpeg file is created. (Default: 0 = infinite)
max_mpeg_time 0

#Number of frames per second to capture when not detecting
#motion (saves CPU load) (Default: 0 = disabled)
low_cpu 0

#Always save images even if there was no motion (default: off)
output_all off
Threshold
The 'threshold' option is the most important option. When motion runs it compares the current image frame with the previous and counts the number of changed pixes (ignoring the ones that have changes intensity less then defined by 'noise_level'). If more pixels then defined by 'threshold' have changed we assume that we have detected motion. Set the threshold as low as possible so that you get the motion you want detected but large enough so that you do not get detections from noise and plants moving. Note that the larger the your frames are, the more pixels you have. So for large picture frame sizes you need a higher threshold.
Noise Level
Any camera produces noise. This can especially be seen in the dark. To avoid that noise triggers motion, each pixel must change intensity over a certain limit before it is counted. This limit is defined by the option 'noise_level'.
Automatic Threshold and Noise Tuning
Automatic threshold tuning and automatic noise tuning can be activated or deactivated by the config file options 'threshold_tune' and 'noise_tune'.
Both algorithms are still new and may not yet be optimal. Try them and if they do not work, use the good old manual setting. We on the Motion mailing list are always interested in hearing your experience and especially any improvement you may have made to the source.
Night Compensate
The option 'night compensate' allows the noise threshold to be lowered if the picture is dark. This will improve the sensitivity in dark places. However it might also increase the number of false alarms since most cameras also compensate for this with their AGC which will increase noise. Default: off. Do not use this with 'noise_tune' on.
Despeckle (with labeling)
A way of tuning (by removing or enhancing) noise in the motion image. Options for the despeckle feature are any of 'e', 'E', 'd' or 'D'. This can be combined by a trailing 'l' (letter l) which enables the labeling feature. Default: Not Defined (Don't despeckle and label).
Wind blowing grass and trees around or poor light conditions can cause a lot of dots (or noise) to appear in the motion image (See the section on Tuning Motion). This feature removes (or enhances!) this noise and so improves the reliability of motion.
The 'e' option removes diamonds, 'E' removes squares and alternating eE will remove circles. Each e/E you add will shrink the noise by a pixel all the way around. So 'despeckle Ee' will remove circles of radius 2. However, this will also shrink the detection by 2 and will affect the threshold. So to remove noise and then restore the detected motion to its original size try 'despeckle EedD'.
After the despeckle feature is done you can let the labeling feature search for areas of connected pixels and "label" each area. The program will now trigger motion based on the number of changed pixels in the largest area. In other words, the largest labeled area has to be above the threshold to trigger a motion detected.
The value EedDl is a good starting point. The possible combinations are endless and it requires many experiments to find the best combination. Just remember that the labeling feature only works as intended if it runs after the despecle feature. Ie. the letter 'l' must be the last letter and only one 'l'.
If you have very few problems with false detections leave this option either blank or at EedD which will remove most of the single pixel noise.
A very detailed technical explanation of the despecle part can be found at the webpage of the author of this feature
Ian McConnell's Webcam: Motion Web Page.
Mask File
The mask file must be a pgm format image file (portable gray map). Note that you must choose the BINARY format.
The feature is simple. Create an image of exact the same size as the ones you get from your video device (camera). Make a purely white picture and paint the areas that you want to mask out black. You can also make gray areas where you want to lower the sensitivity to motion. Normally you will stick to pure black and white.
One easy method for generating the mask file is as follows.
You can just take a motion captured picture, edit it with black and white for the mask and save it as a pgm file.
If you cannot save in this format save as a grayscale jpg and then you can convert it to pgm format with
djpeg -grayscale -pnm [inputfile] > mask.pgm
(assuming you have djpeg installed - part of the jpeg lib package).
Note that the mask file option masks off the detection of motion. The entire picture is still shown on the picture. This means that you cannot use the feature to mask off an area that you do not want people to see.
Below are an example of a webcam picture and a mask file to prevent the detection cars in the street.
Normal picture. Notice the street is visible through the hedge.
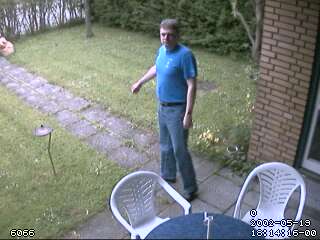
Mask file (converted to png format so it can be shown by your web browser)
Lightswitch
Ignore sudden massive light intensity changes given as a percentage of the picture area that changed intensity.
The value defines the picture areas in percent that will trigger the lightswitch condition. When lightswitch is detected motion detection is disabled for 5 picture frames. This is to avoid false detection when light conditions change and when a camera changes sensitivity at low light.
Valid range: 0 - 100 , default: 0 = disabled
From version 3.1.17 (snap release 2 and on) this option has changed from a boolean (on or off) to a number in percent between 0 and 100. Zero means the option is disabled. Prior to 3.1.17 the feature did not work at all because of a bug.
Minimum Motion Frames
Picture frames must contain motion at least the specified number of frames in a row before they are detected as true motion.
At the default of 1, all motion is detected. Valid range: 1 to thousands, recommended 1-10.
Note that the picture frames are buffered by Motion and once motion is detected also the first frames containing motion are saved so you will not miss anything.
The feature is used when you get many false detections when the camera changes light sensitivity or light changes.
Experiment for best setting. Valid range is 0 to 1000s but for each step larger than 1 Motion reserves space in RAM for the picture frame buffer. Practical range is 1 to 10.
Pre-Capture
Motion buffers the number of picture frames defined by the config option 'pre_capture'. When motion is detected an ffmpeg generated film will begin with the buffered picture frames followed by the frames that were detected as motion and finally additional picture frames are added given by the config option 'post_capture'. The buffered pictures will also be saved as motion triggered images.
The result is that when you see the mpeg films generated by ffmpeg, it appears Motion was able to predict the future and start the film capturing before the event actually started.
If pre_capture is set to 0 the feature is disabled. You can have up to 1000s of pre-captured frames but naturally this makes motion leave a larger footprint in the memory of the computer. More important Motion is processing all the buffered images including saving jpegs, encoding mpegs, writing to databases and executing external programs after the first image is detected as Motion. Motion will not grab another image until this is done. This means that even moderate values for pre_capture combined with high framerates will mean that you will miss quite many frames of Motion. It is therefore recommended to use relative small values for pre_capture. Depending on your chosen framerate and depending on the features enabled values from 1-10 are sensible. If you wish to create smooth mpegs during events it is better to use a large value for post_capture.
Post-Capture
The option 'post_capture' specifies the number of frames to be captured after motion has been detected. Valid range: 0 to thousands, default=0. The purpose of this is mainly to create smooth video clips each time motion is detected. Use it to you personal taste (and disk space).
Gap
The option 'gap' is important. It defines how long a period of no motion detected it takes before we say an event is over. An event is defined as a series of motion images taken within a short timeframe. E.g. a person walking through the room is an event that may have caused 10 single jpg images to be stored. Motion detected includes post_captured frames set by the 'post_capture' option. The 'gap' option defines how long a pause between detected motions that is needed to be defined as a new event. A good starting value is 60 seconds.
The way 'gap' works in more technical terms is:
- Gap is a timer that timeout 'gap' seconds after the last video frame with motion is detected.
- If 'post_capture' is activated then the gap timer starts counting after the last image of the post_capture buffer has been saved.
- The gap timer is reset and starts all over each time new motion is detected, so you will not miss any action by having a short 'gap' value. It will just create more events (e.g. more mpegs files)
The gap value impacts many functions in Motion.
- When the gap timer runs out the event number is increased by one next time motion is detected. When you use the %v conversion specifier in filenames or text features this means that the number in filename or text increased by one.
- The pre_capture feature only works at the beginning of an event. So if you have a very large 'gap' value pre_capture is not working very often.
- When you make mpegs using the ffmpeg features a new mpeg file is started at the beginning of an event when the first motion is detected. When 'gap' seconds has passed without motion (and post_captured frames saved) the mpeg files is completed and closed.
- Do not use large gap values to generate one large mpeg4 file. If Motion stops working this mpeg4 file never gets properly completed and closed and you will not be able to view it.
- Some of the tracking features sets the camera back to the center position when an event is over.
Note that 'gap' and 'minimum_gap' have nothing to do with each other.
Minimum Gap
This option has nothing to do with the 'gap' option. This is the minimum gap between the storing pictures while detecting motion. The value zero means that pictures can be stored almost at the framerate of the camera. Normally you will set this to 0.
This feature is for people that have very limited storage space available and can live with very few pictures saved.
Max mpeg Time
The option max_mpeg_time defines the maximum length of an mpeg movie. Default: 3600 seconds (one hour). Set this to zero for unlimited length.
Low CPU (low_cpu) Mode
To save computer power on slow computers there is a 'low_cpu' option which lowers the number of frames per second that motion captures from the camera to the value defined by this option, when motion is not detected. A value of zero means that the low_cpu option is disabled.
The "output_all" Option
This new feature is not meant to be the normal mode of operation. Especially not if you have the output_normal or output_motion features enabled since it will keep on saving pictures on the disk and you will soon run out of disk space. All features are triggered like it was detecting motion all the time. It does all the normal actions that are done when motion is detected. It saves pictures on the harddisk, runs scripts, sends emails etc as fast as the frame rate of the camera. So it is probably a good idea to run with a low framerate when using this feature and to not use activate all the features that saves files on the disk. This parameter is default off and not included in the default motion.conf file that comes with 3.1.10.
The idea of this feature is that you can turn the feature on and off for a short period of time to test or to generate continuous mpeg films when needed. You can then use the motion-control program to turn the feature on a off.
The following options controls how Motion generates images when detection motion.
############################################################
# Image File Output
############################################################

#Output 'normal' pictures when motion is detected (default: on)
output_normal on

#Output pictures with only the pixels moving object (green ghost images) (default: off)
output_motion off

#The quality (in percent) to be used by the jpeg compression (default: 75)
quality 75

#Output ppm images instead of jpeg (default: off)
ppm off
The 'option_normal' option activate saving normal pictures when detecting motion.
The 'output_motion' option activate saving pictures that shows which pixels have been detected as motion. You will normally set this option to 'off'. See the 'Tuning Motion' section.
The 'quality' option sets the quality (in percent) of the saved jpeg images. The higher the number the batter quality and the larger file sizes. A good compromise is 75%.
The option 'ppm' produces non compressed pictures in the ppm format. They take a lot of diskspace. Only recommended if you need a very high picture quality. This parameter must be 'off' if you wish to use the Berkeley mpeg_encode feature to make mpegs.
Motion contains a number of features that helps you tune the settings of motion to the optimal. They are all described in the config file table above but this section will try to illustrate them a bit more and give some guides to how to tune.
The settings that are difficult to set are the settings that decides or influence when to detect motion. These are
- threshold
- number of changed image pixels that triggers motion detection
- threshold_tune
- automatically tune threshold down of possible
- noise_level
- noise threshold for detecting a pixed as changed
- noise_tune
- automatically tune noise_level
- night_compensate
- adjust threshold/noise for very dark frames (don't mix with noise tune)
- despeckle
- Eliminate single or few pixels of noise
- mask_file
- mask that disables motion detection in areas of the picture
- light_switch
- try to filter out sudden light switches
- auto_brightness
- let motion regulate brightness of video device (use only with devices without built-in autobrightness)
- roundrobin_frames
- number of frames to capture in each roundrobin step
- roundrobin_skip
- number of frames to skip before each roundrobin step
- switch_filter
- try to filter out noise generated by roundrobin
Special tuning options
- daemon off
- Setting daemon to off enables you to see the debugging texts and error messages that motion creates during operation. Motion writes every time it saves a file and you can see the motion detection value. Setting "always_changes" to on gives you even further information which will help you setting the noise_level/night_compensate/threshold parameters.
- always_changes
- You need to run motion in non-daemon mode so that you can see the text output on the terminal. This is very useful to see how many changes motion sees AFTER the noise_level filter has been used.
- locate
- Locate can be used as a normal feature showing you where in the picture the motion was detected. Even if you do not want this feature e.g. on a public webcam it is still useful as a debugging/tuning tool to set the parameters such as noise_level/night_compensate/threshold/mask_file parameters
- text_changes
- Shows the number of pixels detected as motion as a number displayed in the upper right corner of the images and films. Again this is is very useful to see how many changes motion sees AFTER the noise_level filter has been used.
- motion_video_pipe/video_pipe
- These feature enables you to see live what motion sees. Being a command line only program makes motion difficult to setup but also enables the program to run in the background using very few resources and it can easily be started up automatically when booting. The motion_video_pipe shows you the motion images that are generated when motion is detected. The video_pipe shows the normal picture.
- pre_capture
- The feature buffers up the number of picture defined by this option and include them when motion is detected. This is a nice feature not only for testing and tuning. By enabling this feature you can see the frame just before motion was detected. This helps identifying what causes unwanted motion detections.
- output_motion
- This feature help you to see exactly what the motion sees as motion in the picture. What you get is a green image that shows the pixels that changed. Motion has an simple but brilliant algorithm to detect motion where the previous pictures taken are used to create a reference picture. Motion detected are differences between the latest picture and the reference picture. The reference frame is generated from the past picture frames. For each new frame the older frames gets less and less 'weight'. This is why you see motion as a bright green images and weaker ghost or shadow images.
- ffmpeg_cap_motion
- Same feature as output_motion except the changed pixels are captured in mpeg films.
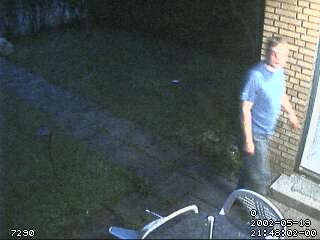
Normal picture frame
Motion type picture frame without despeckle
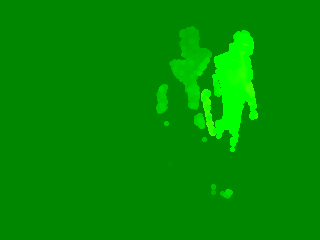
Motion type picture frame with despeckle set to EedD
--
KennethLavrsen - 19 Sep 2004
The ffmpeg option can generate mpeg films very fast and "on the fly". This means that the mpeg film is growing each time motion is detected. With the Berkeley mpeg_encode feature the film is generated based on the saved jpg pictures. With ffmpeg the film is generated directly by motion.
Some people on the Motion mailing list have had trouble building the ffmpeg package because they did not have the NASM assembler package installed. So pay attention to this if you run into problems.
Motion works with the current
version 0.4.8 of ffmpeg which is the time of this document is the latest
released version available at the ffmpeg website. CVS versions of ffmpeg and the 0.4.9-pre1 have a different API and will not work at all. When the 0.4.9 becomes a released version (or at least generally available as RPM and Debian packages) we will bring Motion up to date.
To build it from source follow these steps:
Download the ffmpeg and untar it to /usr/local/ffmpeg. Then it should be a simple matter of entering the ffmpeg directory and run the commands
cd /usr/local/ffmpeg
./configure --enable-shared
make
make install
This creates the
libavcodec.so and
libavformat.so libraries under
/usr/local/lib and header files under
/usr/local/include/ffmpeg.
You probably need to do one more step.
Make sure you have 'root' priviledges for the next steps.
Open the file
/etc/ld.so.conf in your favorite text editor.
Add this line of text if it is not already there - otherwise go to the next step (ldconfig).
/usr/local/lib
Run the command
ldconfig.
Motion should now be able to find the shared libraries for ffmpeg (
libavcodec.so and
libavformat.so) in
/usr/local/lib.
You can also find a pre-compiled binary package (e.g. rpm or deb) and install this. Normally an rpm will place the
libavcodec.so under
/usr/lib.
There are various RPMs available from different repositories. Some need additional RPMs that are actually not needed by Motion but need to be installed to satisfy dependencies. The editor has tried different RPMs of ffmpeg-0.4.8 and they all seem to work.
Motion then need to be built by running
./configure,
make and
make install.
(Note that with earlier versions of motion you had to specify the location of libavcodec. Now configure searches for the shared library in
/usr/lib and
/usr/local/lib by default.)
These are the config file options related to ffmpeg.
############################################################
# Film (mpeg) File Output - ffmpeg based
############################################################

#Use ffmpeg to encode mpeg movies in realtime (default: off)
ffmpeg_cap_new on

#Use ffmpeg to make movies with only the pixels moving
#object (green ghost images) (default: off)
ffmpeg_cap_motion on

#Use ffmpeg to encode a timelapse movie
#Default value 0 = off - else save frame every Nth second
ffmpeg_timelapse 0

#The file rollover mode of the timelapse video
#Valid values: hourly, daily (default), weekly-sunday, weekly-monday, monthly, manual
ffmpeg_timelapse_mode daily

#Bitrate to be used by the ffmpeg encoder (default: 400000)
#This option is ignored if ffmpeg_variable_bitrate is not 0 (disabled)
ffmpeg_bps 500000

#Enables and defines variable bitrate for the ffmpeg encoder.
#ffmpeg_bps is ignored if variable bitrate is enabled.
#Valid values: 0 (default) = fixed bitrate defined by ffmpeg_bps,
#or the range 2 - 31 where 2 means best quality and 31 is worst.
ffmpeg_variable_bitrate 0

#Codec to used by ffmpeg for the video compression.
#Timelapse mpegs are always made in mpeg1 format independent from this option.
#Supported formats are: mpeg1 (default), mpeg4, and msmpeg4.
#mpeg1 gives you files with extension .mpg
#mpeg4 or msmpeg4 give you files with extension .avi
#msmpeg4 is recommended for use with Windows Media Player because
#it requires with no installation of codec on the Windows client.
ffmpeg_video_codec mpeg1
- ffmpeg_cap_new
- Generates a new film at the beginning of each new 'event' and appends to the film for each motion detected within the same event. The current 'event' ends when the time defined by the 'gap' option has passed with no motion detected. At the next detection of motion a new mpeg film is started. Default: off.
- ffmpeg_cap_motion
- Works like ffmpeg_cap_new but outputs motion pictures instead. Default: off.
- ffmpeg_timelapse
- Uses ffmpegs libavcodec to encode a timelaps movie saving a picture frame at the interval in seconds set by this parameter. Setting this option to 0 disables it. The feature gives your viewer the chance to watch the day pass by. It makes a nice effect to film flowers etc closeup during the day. Options like frame_rate, snapshot, gap etc has no impact on the ffmpeg timelapse function. (note: option name ffmpeg_timelapse was renamed to correct spelling in v. 3.1.14 - adding the 'e' at the end). Also note that the timelapse format is always mpeg1 independent of ffmpeg_video_codec. This is because mpeg1 allows the timelapse to stop and the file to be reopened and more film appended.
- ffmpeg_timelapse_mode
- Defines the file rollover mode. Ie. when to close the current timelapse file and start a new one. Valid values: hourly, daily (default), weekly-sunday, weekly-monday, monthly, manual. it is important that you use the conversion specifiers in ffmpeg_filename that ensure that the new timelapse file indeed is a new file. If the filename does not change Motion will simply append the timelapse pictures to the existing file.
- ffmpeg_bps
- Sets the bits per seconds of the generated film. The higher value - the better quality - the bigger file. Experiment to get the desired quality/file sizes. Default is 400000 bps. This option is ignored if ffmpeg_variable_bitrate is not 0 (disabled)
- ffmpeg_variable_bitrate
- Enables and defines variable bitrate for the ffmpeg encoder. ffmpeg_bps is ignored if variable bitrate is enabled. Valid values: 0 (default) = fixed bitrate defined by ffmpeg_bps, or the range 2 - 31 where 2 means best quality and 31 is worst. Experiment for the value that gives you the desired compromise between size and quality.
- ffmpeg_video_codec
- Selects the codec to used by ffmpeg for the video compression. Timelapse mpegs are always made in mpeg1 format independent from this option. Supported codec formats are: mpeg1 (default), mpeg4, and msmpeg4.
'mpeg1' gives you files with extension .mpg
'mpeg4' or 'msmpeg4' give you files with extension .avi
msmpeg4 is recommended for use with Windows Media Player because it requires with no installation of codec on the Windows client.
Note that timelapse mpegs are always made in mpeg1 format and ignores this setting. This is because the mpeg1 encoder allows appending to an existing mpeg1 file and we need this feature for timelapse - both for when motion is stopped and re-started and during a pause.
See also the section 'Advanced Filenames' where the two additional options 'ffmpeg_filename' and 'timelapse_filename' are defined.
If you want to use this feature you can read about the
FFmpeg Streaming Multimedia System
Before you start - consider using ffmpeg instead. It is a much more up to date way to generate mpegs and ffmpeg has much more features.
It is being considered removing support for the mpeg_encode in a future version of Motion. If you would like to keep this feature in the future let us know on the Motion Mailing List.
To use this feature you need to install the
Berkeley mpeg_encode program.
The program is pretty old (1995) and there has been some problems with compiling the source code. There is a guy doing an exciting project called
AMIDE. This project includes the mpeg_encode program and it seems that the author of AMIDE has polished the old mpeg_encode a little bit calling it 1.5c. The author has placed 2 versions. A binary only RPM for the Intel 386 platform and two RPMs with full source. I installed just the binary RPM from the AMIDE site and it worked fine. The binary RPM contains only two files: mpeg_encode itself which it installs in /usr/bin and a manual page. Motion looks for the mpeg_encode in /usr/bin per default. You can change this by setting config file option mpeg_encode_bin.
The feature itself works like this:
Every time motion detects motion a jpg picture is stored. This happens at the framerate you have specified with the 'framerate' option (or at the interval set by the 'minimum_gap' option if different from zero). When the event is over (time defined by the 'gap' option) motion generates a small mpg film using mpeg_encode. This is important to notice when you test the feature the first time. You will have to wait the period defined by 'gap' before you see the mpg file on your disk. If you have used a small framerate or used the minimum_gap option the film is going to be over in a split second. For this feature to be useful you should let motion store pictures almost real time. To generate better films you can play with options like 'post_capture' which will take extra picture after a motion is detected to create better floating films and 'adjust_rate' which will try to generate a 25 fps film. To avoid your harddisk from getting full because a bird is hopping around on the lawn, there are two parameters you can use. 'jpg_cleanup' will delete all the jpg files once the mpeg has been generated. 'max_mpeg_time' limits the duration of an mpeg film to the number of seconds you specify.
The following motion.conf settings controls the Berkeley mpeg_encode feature and shows the typical setting one would choose
############################################################
# Film (mpeg) File Output - Berkeley mpeg_encode Based
############################################################

#Use mpeg_encode from berkeley to encode movies  (default: off)
mpeg_encode on

#Path to the mpeg_encode binary (default: /usr/bin/mpeg_encode)
mpeg_encode_bin /usr/bin/mpeg_encode

#Adjust the number of frames for an mpeg movie (only mpeg_encode) to get 25fps  (default: off)
adjust_rate on

#Delete jpeg images after they have been converted to movies by mpeg_encode (default: off)
#This option is only used when mpeg_encode is on
jpg_cleanup on
Important! The Berkeley mpeg_encode feature requires that the motion.conf options for target_dir and filenames follows some strict rules:
- Your target_dir option should be an absolute path (starting with /) when using mpeg_encode.
- The option berkeley_single_directory controls the directory structure below target_dir: 'on' = place mpeg_encode file in target_dir/YYYYMMDDHHMMSS-n, 'off' (default) = place files as target_dir/YYYY/MM/DD/SS-n.
- If you set berkeley_single_directory 'on', jpeg_filename must be %v-%Y%m%d%H%M%S-%q
- If you set berkeley_single_directory 'off', jpeg_filename must be %Y/%m/%d/%H/%M/%S-%q
The reason is that mpeg_encode needs to know where to find the jpegs and it depends on details in the filenames to build the mpeg.
These are the motion.conf options to watch out for.
#File path for motion triggered images (jpeg or ppm) relative to target_dir
#Default: %v-%Y%m%d%H%M%S-%q
#Default value is equivalent to legacy oldlayout option
#For Motion 3.0 compatible mode choose: %Y/%m/%d/%H/%M/%S-%q
#File extension .jpg or .ppm is automatically added so do not include this
#For use of Berkeley mpeg_encode this parameter but be set as follows:
#If berkeley_single_directory = on: %v-%Y%m%d%H%M%S-%q
#If berkeley_single_directory = off: %Y/%m/%d/%H/%M/%S-%q
jpeg_filename %v-%Y%m%d%H%M%S-%q

#Use single directory structure (For Berkeley mpeg_encode feature only)
#on = place mpeg_encode file in target_dir with name YYYYMMDDHHMMSS-n
#off (default) = place files as target_dir/YYYY/MM/DD/SS-n
berkeley_single_directory off
Motion can also act like a traditional web camera.
The option 'snapshot_interval' enables the snapshots feature by being set to a value different than 0. The value gives the number of seconds between each snapshot.
See the 'snapshot_filename' option in the section 'Advanced Filenames'.
Text features have been made highly flexible starting from version 3.1.13 of Motion. It enables you to taylor the text displayed on the images and films to your taste and to add your own user defined text. From version 3.1.13 all text related motion.conf options have been redefined and renamed.
There are 3 motion.conf options that controls the display of text.
############################################################
# Text Display
# %Y = year, %m = month, %d = date,
# %H = hour, %M = minute, %S = second, %T = HH:MM:SS
# %v = event, %q = frame number, \n = new line
# You can put quotation marks around the text to allow
# leading spaces
############################################################

#Locate and draw a box around the moving object (default: off)
locate off

#Draws the timestamp using same options as C function strftime(3)
#Default: %Y-%m-%d\n%T = date in ISO format and time in 24 hour clock
#Text is placed in lower right corner
text_right %Y-%m-%d\n%T

#Draw a user defined text on the images using same options as C function strftime(3)
#Default: Not defined = no text
#Text is placed in lower left corner
text_left CAMERA 1\nFRONT DOOR

#Draw the number of changed pixed on the images (default: off)
#Will normally be set to off except when you setup and adjust the motion settings
#Text is placed in upper right corner
text_changes off
The
text_left and
text_right options have the similar functions.
- text_left
- Places text in the lower left corner and aligns the text to the left. If the option is not defined the default is no text displayed.
- text_right
- Places text in the lower right corder and aligns the text to the right. If the option is not defined the default is showing date in ISO format YYYY-MM-DD and below this the time as a 24 hour clock HH:MM:SS. If you wish to have no text to the right define text_right to an empty string "".
- text_changes
- Is a feature meant for helping adjusting the threshold and noise_level settings. It shows the number of pixels seen as motion in the upper right corner.
This is how the text is located.
|
|
CHANGES
|
|
TEXT_LEFT
|
TEXT_RIGHT
YYYY-MM-DD
HH:MM:SS
|
|
Both text_left and text_right are highly flexible.
The user defined text can be the english alphabet and a selection of symbols - (A-Z, a-z, 0-9, " / ( ) @ ~ # < > | , . : - + _ \n) and conversion specifiers. Non-english characters are for the moment not supported.
A conversion specifier is a code that starts by % (except newline which is \n). The conversion specifiers used has the same function as for the C function strftime (3). The most commonly used are: %Y = year, %m = month as two digits, %d = date, %H = hour, %M = minute, %S = second, %T = HH:MM:SS. Two are unique to motion %v = event, %q = frame number. With a combination of text, spaces, new lines \n and conversion specifiers you have some very flexible text features. For a full list of conversion specifiers see the section 'Conversion Specifiers for Advanced Filename and Text Feature'.
You are allowed to put the text in quotation marks. This allows you to use leading spaces. By combining spaces and new lines '\n' you can place your text anywhere on the picture. Experiment to find your preferred look. When setting the text using motion-control to send XML-RPC commands put the text in quotation marks "" to allow for spaces and new lines.
From version 3.1.13 the old_layout option has been replaced by new advanced options:
snapshot_filename,
jpeg_filename,
ffmpeg_filename,
timelapse_filename and
predict_filename.
The Berkeley mpeg_encode feature does not support the advanced filenames. There is a new option called
berkeley_single_directory which is equivalent to the legacy
old_layout options but only used for mpeg_encode. NOTE! When using the Berkeley mpeg_encode feature the
jpeg_filename MUST be defined to a specific value depending on the option
berkeley_single_directory. See the section 'Generating MPEG films Berkeley mpeg_encode' for detailed information. It is recommended to use the newer ffmpeg feature to generate mpegs since it is much more efficient and has more features.
These are the advanced filename options in motion.conf
############################################################
# Target Directories and filenames For Images And Films
# For the options snapshot_, jpeg_, mpeg_ and timelapse_filename
# you can use conversion specifiers
# %Y = year, %m = month, %d = date,
# %H = hour, %M = minute, %S = second,
# %v = event, %q = frame number
# Quotation marks round string are allowed.
############################################################

#Target base directory for pictures and films
target_dir /usr/local/apache2/htdocs/cam1

#File path for snapshots (jpeg or ppm) relative to target_dir
#Default: %v-%Y%m%d%H%M%S-snapshot
#Default value is equivalent to legacy oldlayout option
#For Motion 3.0 compatible mode choose: %Y/%m/%d/%H/%M/%S-snapshot
#File extension .jpg or .ppm is automatically added so do not include this.
#Note: A symbolic link called lastsnap.jpg created in the target_dir will always
#point to the latest snapshot, unless snapshot_filename is exactly 'lastsnap'
snapshot_filename %v-%Y%m%d%H%M%S-snapshot

#File path for motion triggered images (jpeg or ppm) relative to target_dir
#Default: %v-%Y%m%d%H%M%S-%q
#Default value is equivalent to legacy oldlayout option
#For Motion 3.0 compatible mode choose: %Y/%m/%d/%H/%M/%S-%q
#File extension .jpg or .ppm is automatically added so do not include this
#For use of Berkeley mpeg_encode this parameter but be set as follows:
#If berkeley_single_directory = on: %v-%Y%m%d%H%M%S-%q
#If berkeley_single_directory = off: %Y/%m/%d/%H/%M/%S-%q
jpeg_filename %v-%Y%m%d%H%M%S-%q

#File path for motion triggered ffmpeg films (mpeg) relative to target_dir
#Default: %v-%Y%m%d%H%M%S
#Default value is equivalent to legacy oldlayout option
#For Motion 3.0 compatible mode choose: %Y/%m/%d/%H%M%S
#File extension .mpg or .avi is automatically added so do not include this
ffmpeg_filename %v-%Y%m%d%H%M%S

#File path for timelapse mpegs relative to target_dir (ffmpeg only)
#Default: %Y%m%d-timelapse
#Default value is near equivalent to legacy oldlayout option
#For Motion 3.0 compatible mode choose: %Y/%m/%d-timelapse
#File extension .mpg or .avi is automatically added so do not include this
timelapse_filename %Y%m%d-timelapse

#Use single directory structure (For Berkeley mpeg_encode feature only)
#on = place mpeg_encode file in target_dir with name YYYYMMDDHHMMSS-n
#off (default) = place files as target_dir/YYYY/MM/DD/SS-n
berkeley_single_directory off

#File path for prediction files. (Default: %v-%Y%m%d%H%M%S)
#Default value is equivalent to legacy oldlayout option
#For Motion 3.0 compatible mode choose: %Y/%m/%d/%H%M%S
#File extension .desc is automatically added so do not include this
predict_filename %v-%Y%m%d%H%M%S
The option
target_dir is the target directory for all snapshots, motion images and normal images. The default is the current working directory (current working directory of the terminal from which motion was started). You will normally always want to specify this parameter either as a command line option or in the config file. Use an absolute directory path (not relative) if you want to use mpeg_encode.
Note that the options
snapshot_filename,
jpeg_filename,
ffmpeg_filename,
timelapse_filename and
predict_filename all allow specifying directories. These will all be relative to
target_dir. This means in principle that you can specify
target_dir as '/' and be 100% flexible. It also means that Motion can write files all over your harddisk if you make a mistake. It is recommended to specify the
target_dir as deep or detailed as possible for this reason.
The Berkeley mpeg_encode feature still demands that the
target_dir points directly to the real target directory.
The xxxx_filename options all support the 'Conversion Specifiers for Advanced Filename and Text Features'. This means that you can build up the filenames anyway you want using fixed text mixed with conversion specifiers for time, event and frame.
NOTE: Unless you use the
minimum_gap option to limit the number of shots to less then one per second - you must use the frame modifier %q as part of the
jpeg_filename. Otherwise the pictures saved within the same second will overwrite each other. The %q in
jpeg_filename ensures that each jpeg (or ppm) picture saved gets a unique filename.
The table below shows all the supported Conversion Specifiers you can use in the options
text_left,
text_right,
snapshot_filename,
jpeg_filename,
ffmpeg_filename,
timelapse_filename and
predict_filename.
In
text_left=and =text_right you can additionally use '\n' for new line.
| Conversion Specifier |
Description |
| %a |
The abbreviated weekday name according to the current locale. |
| %A |
The full weekday name according to the current locale. |
| %b |
The abbreviated month name according to the current locale. |
| %B |
The full month name according to the current locale. |
| %c |
The preferred date and time representation for the current locale. |
| %d |
The day of the month as a decimal number (range 01 to 31). |
| %D |
Equivalent to %m/%d/%y. (Yecch - for Americans only. Americans should note that in other countries %d/%m/%y is rather common. This means that in international context this format is ambiguous and should not be used.) |
| %E |
Modifier: use alternative format, see below. |
| %F |
Equivalent to %Y-%m-%d (the ISO 8601 date format). |
| %H |
The hour as a decimal number using a 24-hour clock (range 00 to 23). |
| %I |
The hour as a decimal number using a 12-hour clock (range 01 to 12). |
| %j |
The day of the year as a decimal number (range 001 to 366). |
| %k |
The hour (24-hour clock) as a decimal number (range 0 to 23); single digits are preceded by a blank. (See also %H.) |
| %l |
The hour (12-hour clock) as a decimal number (range 1 to 12); single digits are preceded by a blank. (See also %I.) |
| %m |
The month as a decimal number (range 01 to 12). |
| %M |
The minute as a decimal number (range 00 to 59). |
| %p |
Either 'AM' or 'PM' according to the given time value, or the corresponding strings for the current locale. Noon is treated as `pm' and midnight as `am'. |
| %P |
Like %p but in lowercase: `am' or `pm' or a corresponding string for the current locale. |
| %q |
Picture frame number within current second. For jpeg filenames this should always be included in the filename if you save more then 1 picture per second to ensure unique filenames. It is not needed in filenames for mpegs. |
| %r |
The time in a.m. or p.m. notation. |
| %R |
The time in 24-hour notation (%H:%M). |
| %s |
The number of seconds since the Epoch, i.e., since 1970-01-01 00:00:00 UTC. |
| %S |
The second as a decimal number (range 00 to 61). |
| %T |
The time in 24-hour notation (%H:%M:%S). |
| %u |
The day of the week as a decimal, range 1 to 7, Monday being 1. See also %w. |
| %U |
The week number of the current year as a decimal number, range 00 to 53, starting with the first Sunday as the first day of week 01. See also %V and %W. |
| %v |
Event number. An event is a series of motion detections happening with less than 'gap' seconds between them. |
| %V |
The ISO 8601:1988 week number of the current year as a decimal number, range 01 to 53, where week 1 is the first week that has at least 4 days in the current year, and with Monday as the first day of the week. See also %U and %W. |
| %w |
The day of the week as a decimal, range 0 to 6, Sunday being 0. See also %u. |
| %W |
The week number of the current year as a decimal number, range 00 to 53, starting with the first Monday as the first day of week 01. |
| %x |
The preferred date representation for the current locale without the time. |
| %X |
The preferred time representation for the current locale without the date. |
| %y |
The year as a decimal number without a century (range 00 to 99). |
| %Y |
The year as a decimal number including the century. |
| %z |
The time-zone as hour offset from GMT. |
| %Z |
The time zone or name or abbreviation. |
Motion has a mini (very very mini) http server built in. Each thread can have its own webserver. If you enable the webcam server (option webcam_port to a number different from 0) and you have threads you must make sure to include webcam_port to different ports or zero (disable) in each thread config file. Otherwise motion will crash because each webcam server will use the setting from the motion.conf file and try to bind to the same port.
Note: The webcam server feature requires that the option
ppm is set to
off. (I.e. saved images are jpeg images).
These are the special webcam parameters.
############################################################
# Live Webcam Server
############################################################

#The mimi-http server listens to this port for requests (default: 0 = disabled)
webcam_port 8081

#Quality of the jpeg images produced (default: 30)
webcam_quality 50

#Only output frames if motion is detected (default: off)
webcam_motion off

#Maximum framerate for webcam streams (default: 100)
webcam_maxrate 1

#Restrict webcam connections to localhost only (default: on)
webcam_localhost off

#Limits the number of images per connection (default: 0 = unlimited)
#Number can be defined by multiplying actual webcam rate by desired number of seconds
#Actual webcam rate is the smallest of the numbers framerate and webcam_maxrate
webcam_limit 1200
The
webcam_maxrate and
webcam_quality options are important to limit the load on your server and link. Don't set them too high unless you only use it on the localhost or on an internal LAN. The option
webcam_quality is equivalent to the quality level for jpeg pictures.
The
webcam_limit option prevents people from loading your Network connection by streaming for hours and hours. The options defines the number of picture frames sent as mjpeg Motion will allow without re-connecting (e.g. clicking refresh in the browser).
The option
webcam_localhost is a security feature. When enabled you can only access the webserver on the same machine as Motion is running on. If you want to present a live webcam on your web site this feature must be disabled.
The webserver generates a stream in "multipart jpeg" format (mjpeg). You cannot watch the stream with most browsers. Editor has tried Internet Explorer 6, Netscape 6.2 (windows) and Konqueror. Only Netscape on Linux can show the stream. For public viewing this is not very useful. There exists a java applet called
Cambozola. Same tool is also used in the
motion.cgi program that is available from the motion homepage. To enable the feature to a broad audience you should use this applet or similar.
To use the webcam feature with Cambozola is actually very simple.
1. Create a html page in which you will want the streamed picture.
2. In the html page include this code
<applet code=com.charliemouse.cambozola.Viewer
    archive=cambozola.jar width=400 height=300>
    <param name=url value=http://www.myurl.com:8081>
</applet>
Where the width and height is the area of the applet. Adjust it to the same size or a little larger than your streamed image.
Replace www.myurl.com:8081 by the real url and port number of your choice.
3. In the same directory you place the cambozola.jar file. No need to build the java applet from source. Simply use the applet in the package. Or copy it from motion.cgi package. It is the same version.
4. Enable the feature in motion.conf.
Motion version 3.1.12 has got a new exciting feature which is the ability to control Motion while it is running. Motion now has a built in http server called xmlrpc-httpd. This listens on a port specified by the new 'control_port' config file option. The control protocol is called xml-rpc. With Motion there is a small program that can be built and which can be used to control all the new control features of Motion.
Installing XMLRPC-C
First, the xmlrpc stuff we need to install is located here:
http://xmlrpc-c.sourceforge.net/downloading.php
Latest XMLRPC-C version is 0.9.10 (not 0.9.9 as their homepage suggests).
At Sourceforge you find the latest files.
http://sourceforge.net/project/showfiles.php?group_id=16847
XMLRPC-C from RPMs
If you use a distribution using RPM like Red Hat and many other all you need is to download and installed RPMs.
The two RPMs you need are here
http://prdownloads.sourceforge.net/xmlrpc-c/xmlrpc-c-0.9.10-1.i386.rpm?download
http://prdownloads.sourceforge.net/xmlrpc-c/xmlrpc-c-devel-0.9.10-1.i386.rpm?download
Additionally the two RPMs above need
w3c-libwww installed. The RPMs for w3c-libwww comes with RedHat but are not installed per default.
There are 2 RPMs:
w3c-libwww-5.4.0-4.i386.rpm and
w3c-libwww-devel-5.4.0-4.i386.rpm.
Previous versions of RedHat also have the 3 RPMs on the CDs but in earlier versions. They are probably also OK. The version should not be very critical.
XMLRPC-C from Source Files
For those that do not use distribution based on RPM, the source tar.gz is here
http://prdownloads.sourceforge.net/xmlrpc-c/xmlrpc-c-0.9.10.tar.gz?download
There is however a problem with the package above. It will not compile with gcc compiler version 3.1 and later. Kenneth Lavrsen has patched up the sources with patches found on the Sourceforge xmlrpc-c patch tracker. This patched package has been placed in the Motion Sourceforge Files area under "Related Projects" It is recommended that you download and install this instead.
http://prdownloads.sourceforge.net/motion/xmlrpc-c-0.9.10-kjl3.tar.gz?download
The Libwww can be downloaded from here
http://www.w3c.org/Library/
Follow the installation instructions from the websites of the XMLRPC-C and Libwww libraries.
After installation of xmlrpc-c you need to re-install motion going through all the steps
./configure,
make and
make install
Besides building motion with XML-RPC support it also build a small application called
motion-control which is copied to
/usr/local/bin.
motion-control
The motion-control program is easy to use. Run it without any parameters and it displays the help.
The commands are shown below. Note the following. If you choose to set configuration parameters for thread 0, all threads will be changed. The individual camera threads are numbered 1,2,3....
Configuration parameters are simply named the same as in the motion.conf file. Parameters that are global and not set in a thread config file can only be read from thread 0. Trying to read a global only value from a camera thread will give no value back (same reply as if you ask for a non-existing value). Once you set a value for a thread other than 0 you can read it again from that thread.
The detection pause feature disables the saving of pictures, snapshots etc but does not stop the webcam server. The motion-control action and detection features do not work globally. I.e. 'motion-control action snapshot 0' does not generate snapshots for all cameras. One exception is 'motion-control action quit' which simply makes motion stop running (all processes quit).
The conf write feature
overwrites both the motion.conf and the thread config files in a shorter format with less comments. If you like to keep your config files make sure to save copies of them before you run this control command. If you have changed parameters using the conf set command it is the changed values that get saved to the config files. Global (thread 0) parameters to motion.conf and individual thread values to the thread config files. Files are saved at the same location as they were read from overwriting the existing files.
| Command |
Description |
| motion-control info |
Brief information about motion version and number of threads running. |
| motion-control conf list |
List all configuration parameters/options with their type and a short help text. Not all parameters have a help text yet. |
| motion-control conf get [threadnr] [parameter] |
Get the value of a configuration parameter for a given thread. Thread 0 means the global or default value. If a parameter is not defined for a given thread then this value will be used instead as a default value. |
| motion-control conf set [threadnr] [parameter] [value] |
Set the value of a configuration parameter for a given thread. Thread 0 means the global or default value. If a parameter is not defined for a given thread then this value will be used instead as a default value. |
| motion-control conf write |
Write all motion config files. Both the motion.conf and all thread config files. Note that this overwrites the original config files. All old comments are lost. |
| motion-control action makemovie [threadnr] |
Make an mpeg movie from jpegs using the mpeg_encode tool on a given thread. |
| motion-control action snapshot [threadnr] |
Save a snapshot picture of a given thread. |
| motion-control action quit |
Make motion quit completely. Useful for stopping motion when it runs as a daemon. |
| motion-control detection pause [threadnr] |
Disables the saving of pictures, snapshots etc for a given thread but does not stop the webcam server. |
| motion-control detection resume [threadnr] |
Resume the saving of pictures, snapshots etc for a given thread. |
| motion-control track auto [threadnr] [value] |
Enable auto tracking. 0=disabled, 1=enabled. Auto tracking is always disabled when motion starts. Manual tracking is still possible when auto tracking is turned off. |
| motion-control track set [threadnr] [value_x] [value_y] |
Turn camera to a specific position. Values x and y are in degrees from center. Up and right are positive numbers, Down and left are negative numbers. If you want to move the camera in one dimension and leave the other unchanged set the value for the one to be unchanged to an out of range value such a 1000.
For a Logitech Quickcam Sphere/Orbit the range for pan (x) is -69 to 69 degrees and the range for tilt is -30 to 24 degrees. |
| motion-control track pan [threadnr] [value] |
Turn camera to a position in degrees relative to current position. Value is in degrees and positive values means turn right, negative means turn left.. This is a good command for small step sizes like 10-20 degrees. If value is out of range camera will move as far as it can. |
| motion-control track tilt [threadnr] [value] |
Tilt camera to a position in degrees relative to current position. Value is in degrees and positive values means tilt up, negative means tilt down. This is a good command for small step sizes like 5-10 degrees. If value is out of range camera will move as far as it can. |
The
conf set [threadnr] [parameter] [value] feature is very smart for trying tuning settings and for changing the user defined on screen display.
By setting the option
control_localhost to "on" Motion can only be controlled via xml-rpc from the same machine on which Motion is running. If you need more refined access control use your firewall such as ipchains or iptables for it.
As mentioned above there is a config file option called
control_port. You should normally set this to 8080. If you need to set it to another port you will also need to change the port number defined in the motion-control source file. Look for the line
#define MOTION_URL "http://localhost:8080".
Same line can be changed to a real URL so that you can control Motion from a remote machine.
This is still at the experimental stage. Read more about it motion tracking page.
Tracking Feature with Logitech Quickcam Sphere/Orbit
Motion supports controlling the pan and tilt feature of a Logitech Quickcam Sphere/Orbit.
Motion can move the camera to a fixed position given in degrees pan (left-right) and tilt (down-up). Movement can be set with absolute coordinates or relative to current position. There is also an auto tracking feature for the Logitech Quickcam Sphere/Orbit but it is not very mature. It is fun to play with but not very useful yet.
Motion always starts up with auto tracking turned off.
All control is done using the XML-RPC interface. The actual XML-RPC commands are described in the
xmlrpc-api.html document which is part of the distribution and also available on the motion website. The motion-control commands available are:
- motion-control track auto thread_nr value (value: 0=disable, 1=enable)
- motion-control track set thread_nr x-degrees y-degrees
- motion-control track pan thread_nr x-degrees
- motion-control track tilt thread_nr y-degrees
For a detailed description of XML-RPC see the section 'Controlling Motion via xml-rpc'.
Motion can execute external command based on the events.
These are the options:
############################################################
# External Commands, Warnings and Logging:
############################################################

#Output less information and don't sound beeps when detecting motion (default: off)
quiet on

#Always display the difference between captured and reference frame (default: off)
always_changes off

#Email address to send a warning to when detecting motion (default: none)
; mail value

#External command to be executed when detecting motion (default: none)
; execute value

#Number to send an sms to with sms_client (default: none)
; sms value

#Command to be executed each time an image is saved (default: none)
; onsave value

#Command to be executed each time an mpeg movie is created (default: none)
; onmpeg value

#Command to be executed each time a file generated by ffmpeg is closed (default: none)
; onffmpegclose value
- quiet
- is only active when Motion is running in non-daemon mode. When this option is set to 'off' and Motion is running as non-daemon Motion generates a system beep when motion is detected.
- always_changes
- is also only working in non-daemon mode. When activated it constantly shows the number of image pixels changed. See 'Tuning Motion for more information'. Normally you set this option to 'off'
- mail
- when defined it sends an email when motion is detected. Argument is an email address in the normal form name@domain.name. An e-mail is sent for each event. Not each picture.
- sms
- sends an SMS when motion is detected. The argument is the number to send an SMS to with sms_client. Default: none. Not a feature that has received much attention recently. If you live in GSM land you are probably better off using the e-mail to SMS gateway that most GSM providers have using your mail client. For more information see the sms_client home page.
- onsave
- executes the command given when an image is saved. The name of the image will be given as argument. Default: not set. You should give the full path name of the program/script. This can be any type of program or script. Remember to set the execution bit in the ACL and if it is a script type program such as perl or bash also remember the shebang line (e.g.
#!/user/bin/perl) as the first line of the script.
- onmpeg
- executes the command given when an mpeg movie is generated. The name of the movie will be given as argument. Default: not set. You should give the full path name of the program/script. This can be any type of program or script. Remember to set the execution bit in the ACL and if it is a script type program such as perl or bash also remember the shebang line (e.g.
#!/user/bin/perl) as the first line of the script. This feature works best with mpeg movies generated by the Berkeley mpeg encode. When you use ffmpeg the film is generated on the fly instead of from jpeg pictures and onmpeg then runs before the film is actually saved. It is therefore better to use the onffmpegclose option with ffmpeg.
- onffmpegclose
- executes the command given when an ffmpeg movie is closed at the end of an event. The name of the movie will be given as argument. Default: not set. You should give the full path name of the program/script. This can be any type of program or script. Remember to set the execution bit in the ACL and if it is a script type program such as perl or bash also remember the shebang line (e.g.
#!/user/bin/perl) as the first line of the script. The command is run when an event is over. I.e. the number of seconds defined by the time gap has passed since the last detection of motion and motion closes the mpeg file
Motion can be compiled with both MySQL and PostgreSQL database support. When enabled Motion adds a record to a table in the database with fields for filename and time. it also write a field called type. Motion does not place any binary images in the database and it cannot remove old records.
Motion only adds records to the database when files are created. The database contains records of saved files which means to get a record in the database the feature that enables for example motion detection, timelapse, snapshots etc must be enabled. The sql_log options defines which types of files are logged in the database.
The following sql_log options are common to both MySQL and PostgreSQL.
############################################################
# Common Options For MySQL and PostgreSQL database features.
# Options require the MySQL/PostgreSQL options to be active also.
############################################################

#Log to the database when creating motion triggered image file  (default: on)
sql_log_image on

#Log to the database when creating a snapshot image file (default: on)
sql_log_snapshot on

#Log to the database when creating motion triggered mpeg file (default: off)
sql_log_mpeg on

#Log to the database when creating timelapse mpeg file (default: off)
sql_log_timelapse on

#Log to the database when creating a prediction file (default: off)
sql_log_prediction off
See the "MySQL" section for detailed information about the database itself.
MySQL
You can use the MySQL database to register each file that is stored by motion.
You need to generate a new database with a name of your own choice. You must enter this name in the config file (mysql_db option). Select the new database in MySQL and create a new table "security" with the following fields:
- camera (int) - camera (thread) number
- filename (char60) - filename (full path)
- frame (int) - the number of the picture frame
- file_type (int) - file type as a number - see table below..
- text_left (char30) - The text from the text_left option
- time_stamp (timestamp) - timestamp for the picture in native database format
Note from version 3.1.15 the fields have changed a lot. The fields 'camera', 'frame', 'time_stamp' and 'text_left' were added in version 3.1.15. 'type' was renamed to 'file_type' and the fields 'second', 'minute', 'hour', 'day', 'month', and 'year' have been removed (replaced by the much smarter 'time_stamp' field which allows much better queries using native SQL time functions).
These are the file type descriptions and the file type numbers stored in the database.
| Normal image |
1 |
| Snapshot image |
2 |
| Motion image (showing only pixels defined as motion) |
4 |
| Normal mpeg image |
8 |
| Motion mpeg (showing only pixels defined as motion) |
16 |
| Timelapse mpeg |
32 |
| Prediction file |
64 |
You can create the table using the following SQL statement.
CREATE TABLE security (camera int, filename char(60) not null, frame int, file_type int, text_left char(30), time_stamp timestamp(14));
Remember to update grant table to give access to the mysql username you choose for motion.
It would be too much to go into detail about how to setup and use MySQL. After all this is a guide about Motion. However here are some hints and links.
Setting Up a MySQL Based Website - A beginners guide from Linux Planet.
Webmonkey PHP/!MySQL tutorial - Entertaining and easy to read.
The
phpMyAdmin homepage. The best and simplest tool to use MySQL (editors opinion). Requires Apache/PHP.
PostgreSQL
Same/similar as for MySQL above.
Note: Currently the versions of the
Video4Linux Loopback Device will not work on kernel 2.6.X. If you create a version that runs on 2.6.X please send it to Kenneth Lavrsen so we can put it on the Motion website.
You can use this driver for looking at motion in realtime. The video4linux driver is written by the same author as Motion. You can find the source and a brief description at the
video4linux loopback device web page.
The video4linux device is a Kernel module which installs itself as a video pipe. It has an input and an output. The module simply takes anything that comes on its input and send it out at the output. The purpose of this is to create a standard video4linux type video device that other programs can then use. You may now ask: "What do I need that for?".
Only one program can access a video device at a time. When motion is using a camera - no other program can access the same camera. But motion is made to be able to feed a video signal to the video loopback device. This way an additional program such as Camstream, Xawtv, a video stream server etc can watch the signal from a camera that motion uses already. What you see is not the live camera stream but the exact same picture that motion uses for detecting motion and the same pictures that are saved/streamed. You can also choose to see the "motion" type images where you see the pixels that are changing - live. Originally the video4linux pipe was used as an interface between Motion and a Webcam server. Since version 2.9 Motion has had its own webserver so this usage is no longer very relevant.
When you install the video loopback device it will create an input - for example /dev/video5 and an output - for example /dev/video6. You can then tell motion to "pipe" the video signal to the /dev/video5 and look at the pictures live using e.g. Camstream on /dev/video6. Camstream is "fooled" to think it is looking at a real camera.
Installing
Installing the video loopback device is not difficult. At least not when you have this document available.
First you must prepare your system for more video devices. You will need two extra devices for each video pipe that you want.
For example if you have 4 cameras they will probably run at /dev/video0, /dev/video1, /dev/video2, and /dev/video3. So you will need additional 8 video devices. This is easy to do.
mknod /dev/video4 c 81 4
mknod /dev/video5 c 81 5
mknod /dev/video6 c 81 6
mknod /dev/video7 c 81 7
mknod /dev/video8 c 81 8
mknod /dev/video9 c 81 9
mknod /dev/video10 c 81 10
mknod /dev/video11 c 81 11
Note that the video device number is the same as the last parameter given on each line.
You may need to set the ownership and permissions (chown and chmod) to be the same as the video devices that were already there.
Now you need to install the video loopback device.
Download the latest
video4linux loopback device (version 0.91 at the time of this document - distributed as tar'ed and compressed files). Place the file in a place of your own choice.
Untar and uncompress the file to the place you want the program installed. Editor recommends /usr/local/vloopback.
cd /usr/local
tar -xvzf /path/to/vloopback-0.91.tar.gz
You now have a directory called vloopback-0.91. You can rename it to vloopback (mv vloopback-0.91 vloopback). I recommend creating a symbolic link to the current version. This way you can more easily experiment with different versions simply by changing the link.
ln -s vloopback-0.91 vloopback
Now change to the new directory
cd vloopback
Build the code
make
There is a good chance that the make will not work and give you a long list of errors. To run make the following must be available on you machine.
- The kernel source files must be installed.
- The source files must be available at /usr/src/linux.
E.g. the new Red Hat 7.3 does not have a link to the sources called linux. Instead there is a link called linux-2.4. This is easy to fix. Just create a link to the real source tree. Do not rename! Add a link using this command (replacing the kernel version number with the one you have on your machine)
ln -s /usr/src/linux-2.4.18-4 /usr/src/linux
- Alternatively you can change the vloopback makefile so that the "LINUXSRC=/usr/src/linux" line is changed to the actual path. I recommend the link solution since this may solve other similar problems that you can get when installing other software.
When compiling on a newer Linux distribution you may get a warning about a header file malloc.h. To remove this warning simply change the header reference as suggested by the warning.
In vloopback.c you replace the line
#include <linux/malloc.h>
with the line
#include <linux/slab.h>
Install the code you built as a Kernel module. There are two options: pipes should be set to the number of video loopbacks that you want. Probably one for each camera. The dev_offset defines which video device number will be the first. If dev_offset is not defined the vloopback module will install itself from the first available video device. If you want the cameras to be assigned to the lower video device numbers you must either load vloopback after loading the video device modules OR use the dev_offset option when loading vloopback. Vloopback then installs itself in the sequence input 0, output 0, input 1, output 1, input 2, output 2 etc. Here is shown the command for our example of 4 cameras and 4 loopback devices and the first loopback device offset to /dev/video4.
/sbin/insmod /usr/local/vloopback/vloopback.o pipes=4 dev_offset=4
When you run the command you may get a warning about tainting the Kernel. Just ignore this.
You can choose to copy the vloopback.o file into a directory in the /lib/modules tree where the insmod/modprobe programs are already looking for modules. Then the command gets simpler (/sbin/insmod vloopback pipes=.....).
If you want the loopback device to load during boot, you can place the call in one of the bootup scripts such as /etc/rc.d/rc.local. Vloopback should be loaded before you start motion.
To activate the vloopback device in motion set the 'video_pipe' option in the motion.conf file. You can also view the special motion pictures where you see the changed pixels by setting the option 'motion_video_pipe' in motion.conf. When setting the video_pipe and/or motion_video_pipe options either specify the input device as e.g. /dev/video4. You can also set the parameter to '-' which means that motion will find the first vacant video loopback device input. If you have more than one camera you may want to control which loopback device each thread uses. Then you need to define the specific device name in motion.conf for the first camera and in each thread config file for the other cameras. If you set the video_pipe parameter to '-' in the motion.conf file and not setting it in the thread config files, motion automatically assign video devices in the same sequence as the threads are loaded. You can combine both video_pipe and motion_video_pipe but then naturally you will need twice as many pipes.
De-activating should be done with this command
/sbin/modprobe -r vloopback
The Motion Guide author has only very little experience with the feature. At the moment all Motion can do is report recognition as a "Best Guess: Prediction_name value" on the console. Ie. it cannot do anything in Daemon mode. Prediction is controlled by the new 'predict_enable', predict_description' and 'predict_threshold' config file options. This is really experimental code that needs some further work. Once the prediction is working there are many funny features it can be used for where motion can take actions/run scripts/save pictures depending on the kind of motion detected.
These are Jeroen own words for the feature.
prediction is a little experiment I have been doing over the past days...
Using 'description files' that describe a movement. Motion tries to predict what it was that triggered it. At the moment motion can distinguish between me sitting at the computer, me walking out of the room and me walking into the room.
A description is outputted for each event (.desc files). Motion will load files mentioned with 'predict_description' in the config file. These files have three lines: a line with the title, a line with the minimum values and a line with the maximum values. The current version is very rude..... try it, but don't expect to much
HOWTO make a description file:
- wait for an event to create a .desc file e.g.:
- walk in front of the camera
- /2002/07/02/232300.desc is created
- copy it to walk.desc
- edit it: prepend a line with title 'walk
- copy the existing line to get two identical lines
- add 'predict_description walk.desc' to the config file
- start motion
- wait for some more events.
- If you have similar events combine them:
- ./combine walk.desc /2002/07/02/235500.desc
- restart motion again.
- Do this several times to get a description that matches better with new events.
The combine program that Jeroen talks about is included in the Motion 3.1.10+ distribution both as a Intel-386 binary and as source. To build this little application from source simply run this command.
gcc -o combine combine.c
This creates the combine binary in the Motion directory.
Error logging has been implemented so that errors during daemon (background) mode are logged in the syslog.
The syslog is in most Linux systems the file
/var/log/messages (e.g. RedHat/Fedora) or
/var/log/syslog and
/var/log/user.log (e.g. Debian).
--
KennethLavrsen - 28 Jan 2005